- Your cart is empty
- Continue Shopping

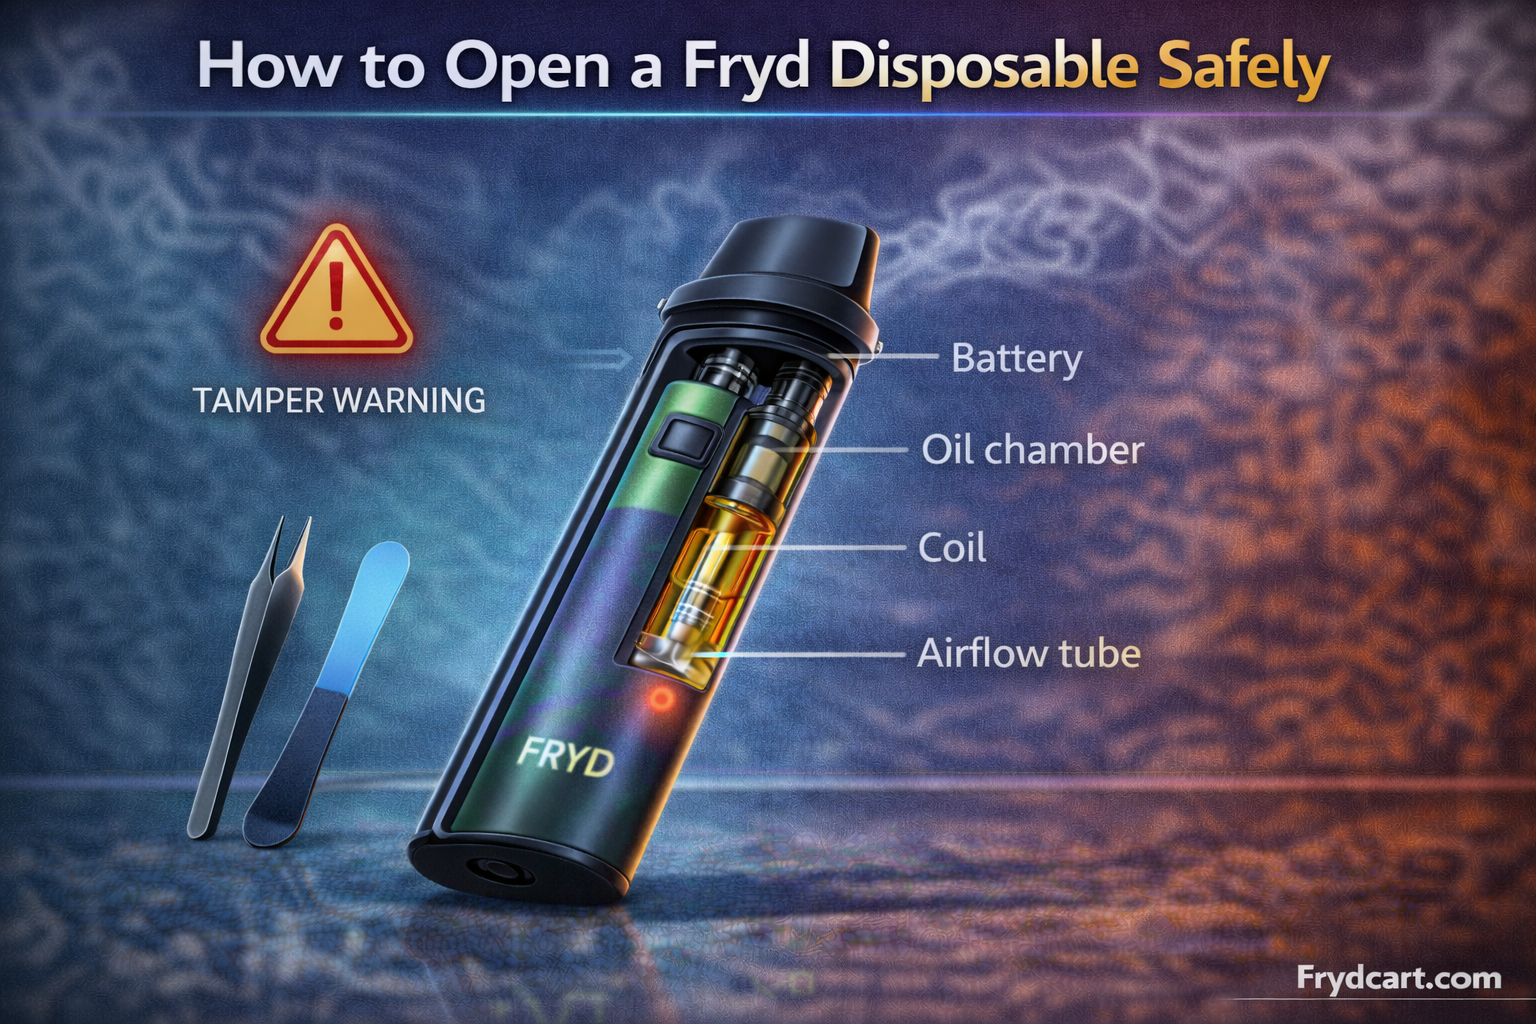
How To Open Fryd Disposable Safely: Read This First
If you’re searching for how to open Fryd Disposable devices, you’re probably trying to see the oil level, fix a clog, or understand the hardware. Before you start prying anything apart, you should understand the safety risks, how the device is built, and when disassembly simply isn’t worth it.
Important Safety Warning
Fryd Disposable, Fryd Dispo, Fryd Disposable 2 Gram and Fryd 3g Disposable vapes are designed as closed systems. Opening them:
- Can expose lithium-ion battery components
- Can cause short circuits and overheating
- May release hot oil or internal wiring
- Almost always voids any store or brand support
If your main goal is to get the device hitting again, it’s usually safer to try standard fixes instead of learning how to open Fryd Disposable hardware. For example, see this guide on How To Fix A Fryd Disposable That Won’t Hit before you attempt any disassembly.
How Fryd Disposable Hardware Is Built
Knowing how a Fryd vape is assembled helps you understand what you’re prying against and what can go wrong.
Main Parts Inside a Fryd Disposable
- Outer shell: Plastic or alloy casing that holds everything together.
- Mouthpiece: The top cap where vapor exits; usually press-fit or lightly glued.
- Oil tank / reservoir: Holds the Fryd Extracts Disposable oil.
- Coil and wick: Heats the oil to produce vapor.
- Airflow channel: Small internal path that can clog.
- Battery: Sealed lithium-ion cell wired to the coil and sensor.
Most Fryd disposable take apart attempts start at the mouthpiece, because it’s the least structurally locked-in piece of the hardware.
When You Should NOT Open a Fryd Dispo
There are several situations where opening the device is a bad idea:
- Device is swollen, hot, or hissing: Signs of battery failure. Do not cut, drill, or pry; follow battery disposal guidelines from the U.S. EPA.
- You plan to reuse the oil in another device: Transferring oil is messy, can contaminate both devices, and is not recommended.
- You want to recharge a non-rechargeable model: DIY charging of bare lithium cells is extremely risky.
- You’re only curious about what’s inside: Look for teardown images or videos online instead of opening live hardware yourself.
Safe Preparation Before Any Disassembly
If you still want to know how to open Fryd Disposable devices after reading the risks, set up your workspace to reduce harm as much as you can.
1. Work Area
- Choose a clean, flat, well-lit surface.
- Keep away from flammable items like paper and fabrics.
- Open a window or work in a ventilated area.
2. Basic Tools
Do not use power tools or anything that can crush the battery. Stick to light hand tools:
- Thin flathead screwdriver or plastic pry tool
- Small pliers (for gentle pulling only)
- Paper towels or wipes for any oil leaks
- Heat-resistant or silicone mat if available
3. Power and Temperature Checks
- Stop using the device for at least 15–20 minutes before opening to let it cool down.
- Do not attempt fryd vape disassembly if the battery area feels warm or soft.
How To Open Fryd Disposable: Mouthpiece-First Method
This is the least aggressive method and is generally used to inspect the tank, confirm remaining oil, or gently clear blockages. It still carries risk, so proceed at your own discretion.
Step 1: Inspect the Mouthpiece
Look closely at the top of the Fryd Disposable:
- Check for a visible seam between the mouthpiece and body.
- See if the mouthpiece has any slight wiggle when you twist it.
- Confirm there are no visible cracks on the shell that might spread.
Step 2: Gently Twist Before Prying
Before inserting any tool:
- Hold the body firmly with one hand.
- With the other hand, twist the mouthpiece side to side.
- If it rotates slightly, there’s usually a press-fit connection rather than a heavy glue bond.
Step 3: Use a Thin Pry Tool
This is the core of how to open Fryd Disposable top caps:
- Insert the very tip of a plastic pry tool or a small flathead between the mouthpiece and body seam.
- Apply minimal upward pressure—think “lifting a paint can lid,” not “breaking a lock.”
- Move around the seam, gently prying at multiple points instead of forcing one side.
If you feel the shell flex hard, stop. Excess pressure can crack the tank or pinch the battery.
Step 4: Lift the Mouthpiece Off
Once you’ve loosened the seam all around:
- Use your fingers, not the tool, to pull the mouthpiece straight up.
- Set it aside on a paper towel in case of residue.
- Inspect the inside of the cap for oil buildup that might have contributed to clogging.
Step 5: Inspect the Oil Tank and Airflow
With the top off, you’ll typically see:
- The top of the oil tank or cotton
- Small airflow holes or channels
- Sometimes a silicone gasket or ring that seals the tank
At this point, many users only wanted a clear view of the oil or access to clear a clog. If you see visible oil and the device still won’t hit, refer back to the troubleshooting steps from the How To Fix A Fryd Disposable That Won’t Hit guide before you go deeper.
Going Deeper: Fryd Disposable Take Apart Risks
Some people try to fully disassemble Fryd disposable hardware to remove the battery or extract oil. This is where risk increases sharply.
Why Full Disassembly Is Risky
- Battery exposure: Bending or puncturing the battery can cause thermal runaway (fire risk).
- Internal wiring: Short circuits can occur if metal tools bridge contacts.
- Oil contamination: Exposed oil can contact dust, metal shavings, or skin.
Health and safety bodies like the CDC advise caution with any e-cigarette hardware handling, especially around damaged batteries.
Signs You Should Stop Disassembly
- Shell starts to buckle or crease near the battery area.
- Any whistling, hissing, or popping sound from inside.
- Sudden warmth while you’re prying, even if mild.
- Strong chemical or metallic smell instead of normal oil scent.
If any of these occur, stop immediately and place the device on a non-flammable surface away from people and pets.
Safer Alternatives to Opening Your Fryd Dispo
1. Use Non-Invasive Fixes for Clogs
Before thinking about fryd vape disassembly, try:
- Gentle preheating if the device has a preheat or button feature.
- Short, light puffs instead of long, forceful pulls.
- Warming the cartridge area in your hands for a minute to loosen thick oil.
2. Choose Reputable Hardware Up Front
If you frequently run into clogging or hit issues, consider upgrading within the product line. Newer Fryd New Gen devices and Fryd 2g Disposables are designed with improved airflow and battery performance, which reduces the need to ever open them in the first place.
3. Proper Storage Habits
Good storage reduces the chance you’ll feel the need to learn how to open Fryd Disposable devices:
- Keep upright when possible to reduce leaks into the airway.
- Avoid leaving in hot cars or direct sun.
- Store at room temperature in a dry place.
Disposal After You Take a Fryd Disposable Apart
If you’ve already opened your Fryd Extracts Disposable device and exposed the internal battery:
- Do not throw the battery in regular trash.
- Wrap exposed ends with non-conductive tape (e.g., electrical tape).
- Use a local battery recycling or hazardous waste drop-off program.
Your city or county website usually lists electronic waste sites and rules. This helps prevent fires in trash trucks and landfills.
Summary: When Is It Worth Opening a Fryd Disposable?
Learning how to open Fryd Disposable devices can help you understand the hardware, but it brings real safety risks. For most users:
- Use soft, non-invasive clog fixes first.
- Only attempt gentle mouthpiece removal if you accept the risk of damaging the device.
- Avoid full fryd disposable take apart attempts focused on the battery or oil extraction.
- Consider newer Fryd Disposable 2 Gram or Fryd 3g Disposable designs with better airflow instead of forcing old hardware apart.
If your device still won’t function after basic steps, replacing it is usually safer and cheaper than pushing disassembly further.